ShopDreamUp AI ArtDreamUp

Deviation Actions


Description
Continue from part 1
This part is difficult to explain. May be, I use word and gramma worng.
Forgive me, if something wrong
======================================
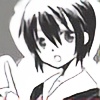
(1) before to coloring cloth, you should to know that where is shadow on the pic (In my pic think shadow is on hatching green and yellow)
Start to coloring scarf
(2) to select dark red color to coloring shadow scarf (I call this color "red 2")
(3) create new layer
Next select on menu bar >> Layer >>Create Clipping Mark (I call layer scarf2)
opacity 80-90%, coloring shadow of scarf
(4) to select dark red color (that darker more than "red 2") to coloring dark shadow on scarf (I call red 3)
(5) coloring dark red (3) in nook of scarf
Start to coloring uniform
(6) to select color same dark hair (I call green2),
Opacity 70-85% and hard brush
create new layer, next select on menu bar >> Layer >>Create Clipping Mark (I call layer "uniform2")
after that coloring dark green on the shadow of uniform (in area darkest shadow)
(7) to change opacity to 30-40% and coloring soft shadow "under bosom"
(I coloring this area is not smooth, but I will do smooth on next step)
(8) To select color on point not smooth ( on the red guide in step 7)
change opacity to 70-85% and coloring area "under bosom" again
now, shadow under bosom is smooth
(9) coloring shadow on the aside skirt
.....but now, I think shadow of bosom is not beautiful so...
(10) to select soft eraser, opacity 20-30%, after that erase at circle point
Step 11-12, I usually use if I want to coloring follow Kuroboushi Kouhaku
(11) create new layer, select on menu bar >> Layer >>Create Clipping Mark (I call layer "uniform 3")
use "Eyedropper Tool" to select base color of uniform (green 1)
to select new color (I call "green3") that light more than "base color of uniform" a little
(12) coloring "green 3" in the selection area (I think this area is bright)
you will see the difference between step 11 and 13
(13) select color 'green3' by Eyedropper tool and coloring again on layer "uniform 2" (at the green guideline)
(14) select red color
create new layer (I call layer "tie1")
coloring at tie
after that select dark red (red 2) to coloring at shadow of tie
(15) select red color and do it like step 11-14
you will see the difference color on tie
(16) when I coloring tie finished, I delete pencil artline that I don't want
(I usually clean picture ,when I do coloring)
(17) create new layer
coloring at mini pocket on belt like step 1-5
clean picture like step 16
Finish coloring
=================================
In conclude, my technique I usually
- use hard brush
- create new layer if coloring different color
I hope this "how to coloring part 2" is useful for you.
This part is difficult to explain. May be, I use word and gramma worng.
Forgive me, if something wrong
======================================
(1) before to coloring cloth, you should to know that where is shadow on the pic (In my pic think shadow is on hatching green and yellow)
Start to coloring scarf
(2) to select dark red color to coloring shadow scarf (I call this color "red 2")
(3) create new layer
Next select on menu bar >> Layer >>Create Clipping Mark (I call layer scarf2)
opacity 80-90%, coloring shadow of scarf
(4) to select dark red color (that darker more than "red 2") to coloring dark shadow on scarf (I call red 3)
(5) coloring dark red (3) in nook of scarf
Start to coloring uniform
(6) to select color same dark hair (I call green2),
Opacity 70-85% and hard brush
create new layer, next select on menu bar >> Layer >>Create Clipping Mark (I call layer "uniform2")
after that coloring dark green on the shadow of uniform (in area darkest shadow)
(7) to change opacity to 30-40% and coloring soft shadow "under bosom"
(I coloring this area is not smooth, but I will do smooth on next step)
(8) To select color on point not smooth ( on the red guide in step 7)
change opacity to 70-85% and coloring area "under bosom" again
now, shadow under bosom is smooth
(9) coloring shadow on the aside skirt
.....but now, I think shadow of bosom is not beautiful so...
(10) to select soft eraser, opacity 20-30%, after that erase at circle point
Step 11-12, I usually use if I want to coloring follow Kuroboushi Kouhaku
(11) create new layer, select on menu bar >> Layer >>Create Clipping Mark (I call layer "uniform 3")
use "Eyedropper Tool" to select base color of uniform (green 1)
to select new color (I call "green3") that light more than "base color of uniform" a little
(12) coloring "green 3" in the selection area (I think this area is bright)
you will see the difference between step 11 and 13
(13) select color 'green3' by Eyedropper tool and coloring again on layer "uniform 2" (at the green guideline)
(14) select red color
create new layer (I call layer "tie1")
coloring at tie
after that select dark red (red 2) to coloring at shadow of tie
(15) select red color and do it like step 11-14
you will see the difference color on tie
(16) when I coloring tie finished, I delete pencil artline that I don't want
(I usually clean picture ,when I do coloring)
(17) create new layer
coloring at mini pocket on belt like step 1-5
clean picture like step 16
Finish coloring
=================================
In conclude, my technique I usually
- use hard brush
- create new layer if coloring different color
I hope this "how to coloring part 2" is useful for you.
Image size
600x2995px 446.66 KB
© 2009 - 2024 neng-neng
Comments6
Join the community to add your comment. Already a deviant? Log In
thank you so much for this^^
It was easy to follow and try out
you're the best Aerith-senpai^^
It was easy to follow and try out
you're the best Aerith-senpai^^